Thursday, November 7, 2013

Thanksgiving and Something New?

   Hi! I am back for my secondthird, fourth post today? Well which ever number it is, I am back to post something else today, and that's an easy and cute Do It Yourself!

   While scrolling through Pinterest, like I have been doing a lot lately :), I noticed just how many cute and simple Thanksgiving table decorations there are out there (I also , might, have noticed all the delicious looking food, but that's besides the point! ;))!

   There also were lots of hand turkeys! Turkeys with poems, turkeys with color, turkeys made out of beans, turkeys made out of paint, markers, ribbon, feathers, crayon, pencil, rice. You name it, there's a hand turkey, somewhere, made out of it ;)!

   The one thing I didn't see much hand turkeys made from was a hand painted with glue, printed on paper, and covered with glitter. (Although I'm sure there is one!) So, I've decided since this year the Thanksgiving table is going to be gold "themed" I would make gold glitter hand turkeys and set them up on the table! To make it more festive and besides, who can beat the classic?


   To start, gather some simple materials!

  • Glue
  • Glitter
  • Paper (of your choice)
  • Pencil (optional)
   Then, everything else is pretty easy! Gather up your kids or do this alone, and these hand turkeys are especially easy for younger kiddos!

1. Paint the hand your going to be use with a liberal amount of glue, (not so much that it's dripping off of your hand, though.)

2. Stamp your hand firmly on your folded piece of paper, (I went with normal printer paper for this, since I didn't have any card stock, but you can use any kind! Also, for smaller turkeys, use a sturdy flash card folded in half and only stamp your pointer finger three times. Use your thumb to make the body (you may need to make the body a bit larger to fit with the wings!))

3. Pour or pat/tap glitter on with a fluffy paint brush over your turkey. (In my case I'm using gold!)


4. Let Dry!


   Or,

   What you'll need for a different version of the one above! (They are pretty much the same, but I thought I would share!)

  • Pencil
  • Glue
  • Paper (of your choice)
  • Small paint brush
1. Start by tracing whichever hand you will be using onto your piece of paper.


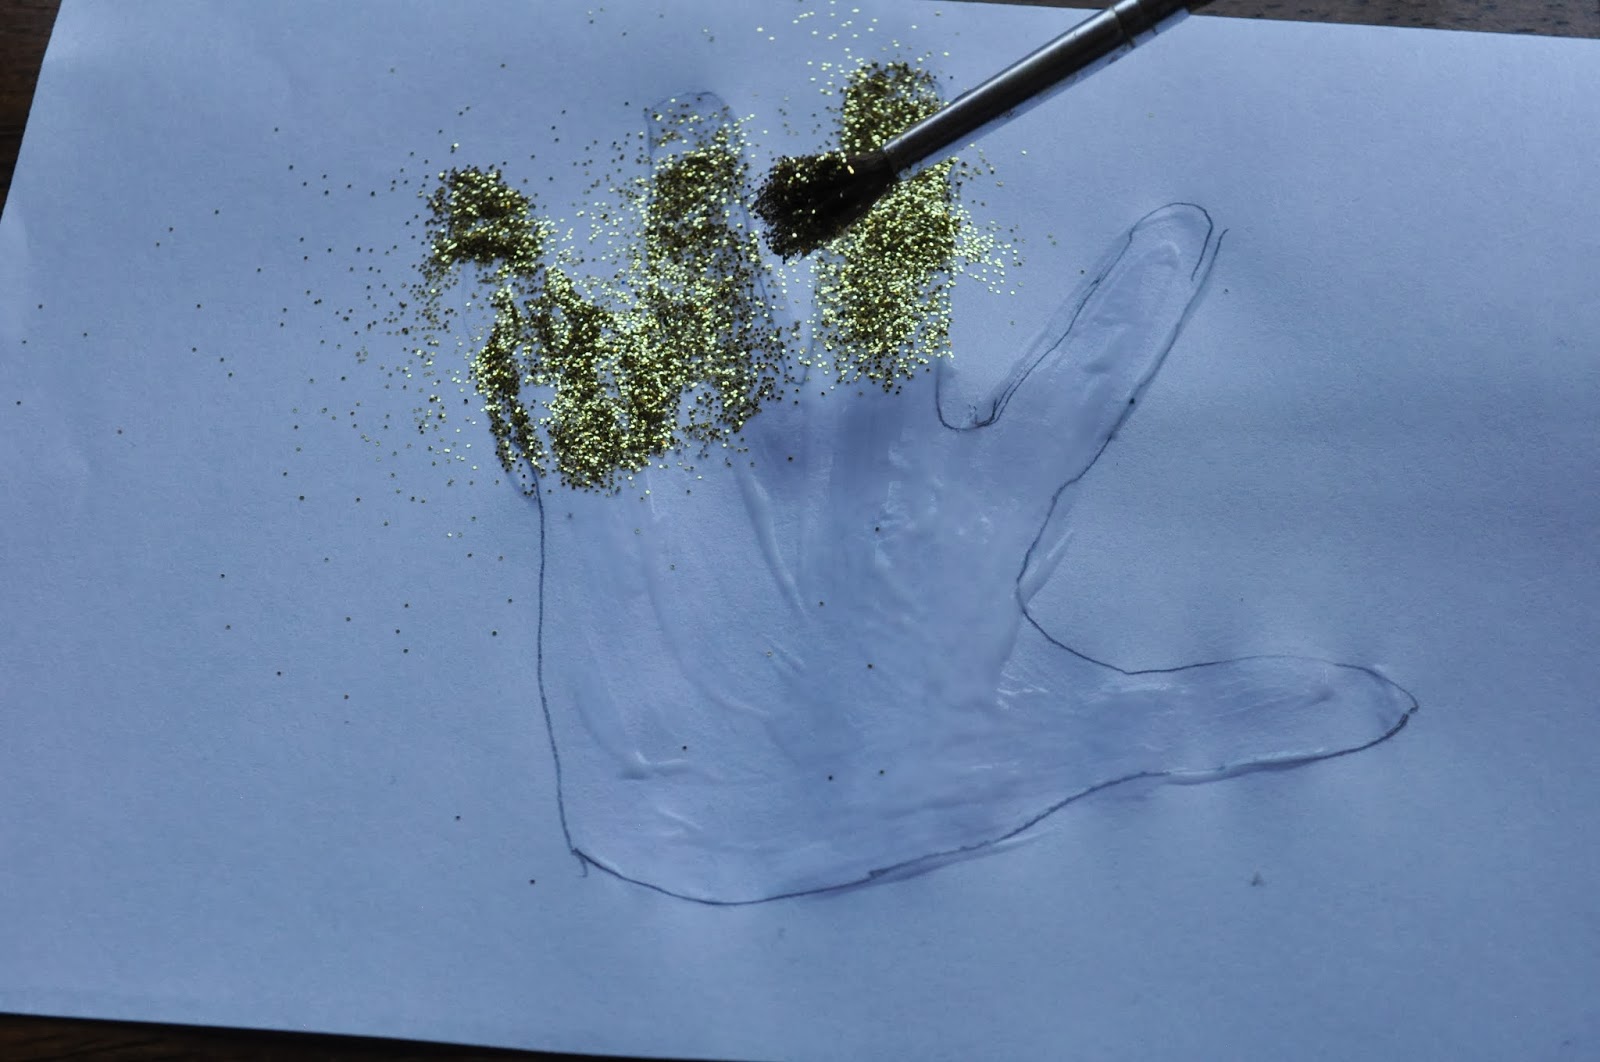
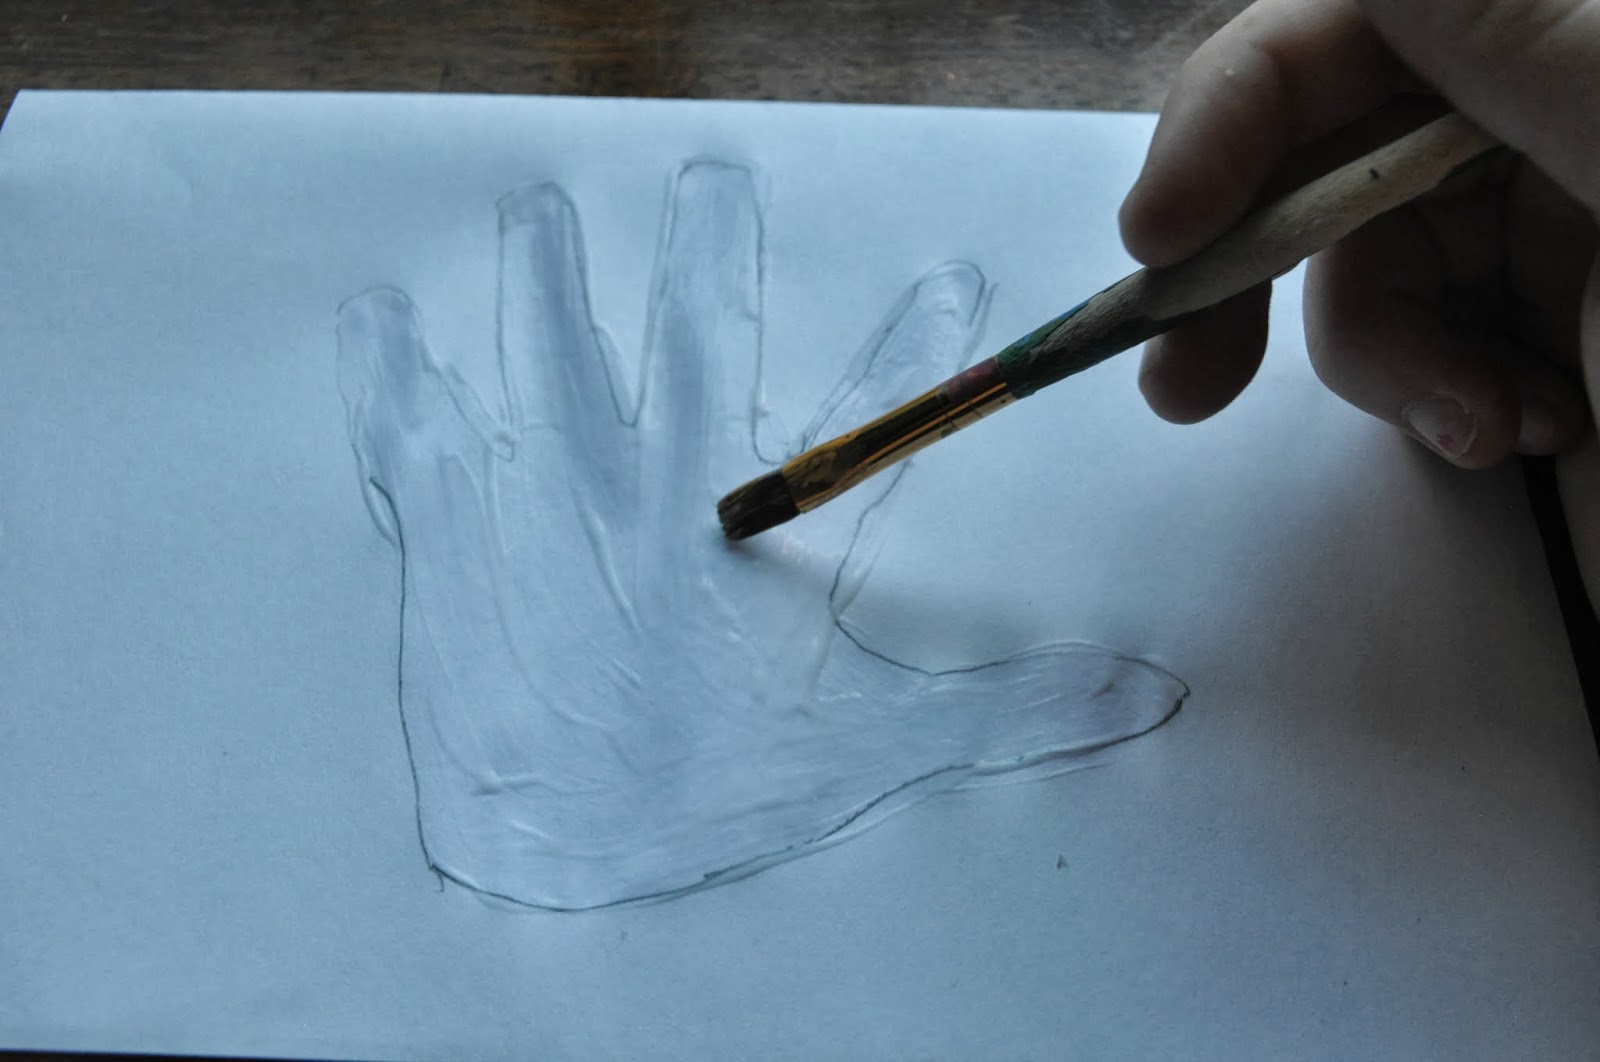
2. Squirt a small amount of glue all of the tracing.

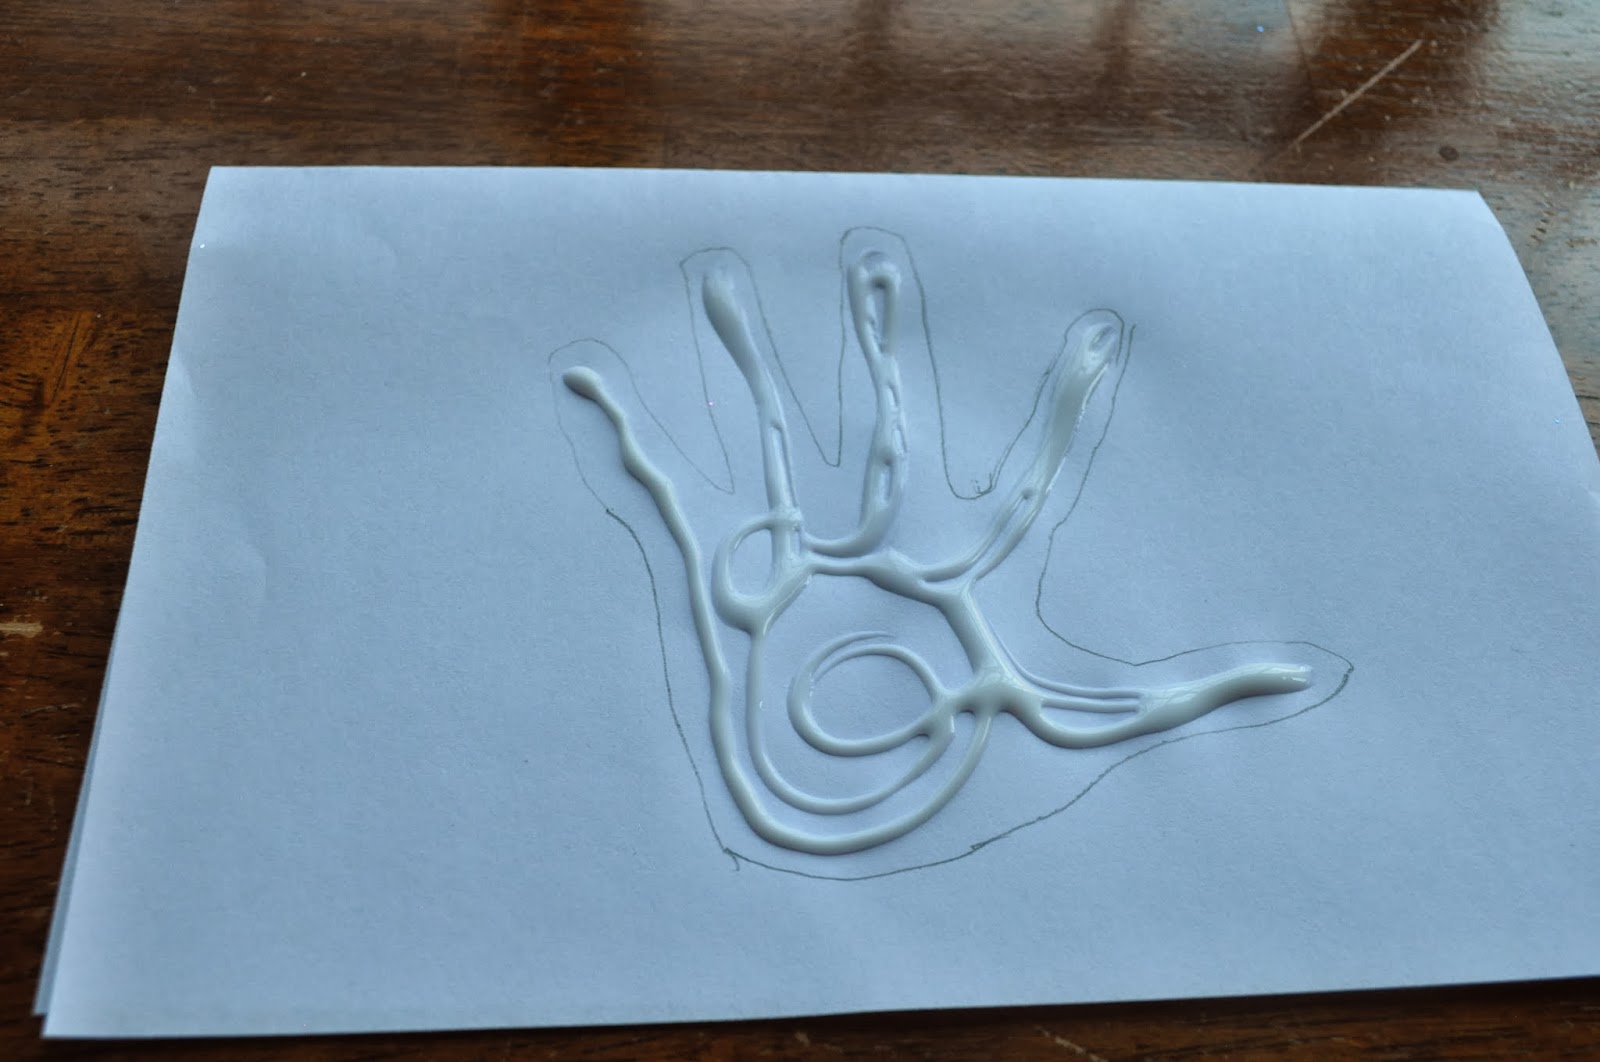
3. Spread the glue into all areas of the hand with your small paint brush.

4. Sprinkle glitter on top of the glue.

5. Pour the access glitter back into your glitter bottle or a trash can.

6. Let dry!

(For the smaller hand turkey here are the steps…  partially in pictures.)

1. Paint your pointer and thumb with glue.

2. Stamp you pointer three different times (to make three feathers) and once in the front to make a head.


3. Using your thumb to make a glue circle big enough to fit with the "feathers".


5. Pour glitter over the glue.


6. Let dry!

   Here are some of the ones I finished! (I ended up putting brown and some red glitter on my turkey instead of going all gold!)


(Just ignore the mess on the upper right corner.. Sticky glue hands accident!)

   I really hope everyone enjoys this! It was SUPER simple, easy, and fun! I hope you try it out and,


Talk to you all soon!


Wednesday, November 6, 2013

Updates!

Hello everyone! I just wanted to do a quick post to update you! 

So, in some of my previous posts I was talking about how I was going to start these "grouped" crafting posts… (posts all on the same topic, "Trying out Pinterest Ideas To See If They Actually Work".)

Needless to say, my attention turned to other things and I became more interested with something else! 
So, I'm sorry if you enjoyed those! I will still be doing DIY's, but not in a so "scheduled" manner!

I am no longer going to be making the "DIY or DIDon't" posts.


I just wanted to make that clear, so that I didn't have loose ends flying around, if that makes any sense!

Talk to you all soon!


Monday, October 21, 2013

Happy Halloween!

Happy, early, Halloween everyone! Only 16 days till Halloween! I can't wait! So, what's everyone going to be? My sister is going to be a super cool Comic Book/ Pop Art girl,


Here are a couple of videos, just so you know what I mean! My brother is going to be a Power Ranger, and it HAS to be the red one, lol!

 And I am going to be a cute, girly nerd!


Talk to you all soon!,


Thursday, August 22, 2013

Free Pinterest Social Media Buttons

I created a few different styles and colors of Pinterest buttons and I thought I would share them with you!
These buttons can be used to link people to your account and to let people pin your posts.

I hope you enjoy!

Tuesday, August 20, 2013

Pictures from a good morning!

How's it going? I hope good!

Today, me and my sister took a moment to go outside and enjoy the morning. (We also took a few pictures!) We used our Nabi 2 to take these.

Morning Glory I planted during Spring.

Marigolds that go around the perimeter of our garden, to keep bugs away.

Our kitty, Layla

Our other kitty, Nala.


Our Maine Coon, Simon.

Berries from our Crape Myrtle.
My sister took (this one) & the next three pictures.. She was going to use this as the background image for the Nabi.


"Action Shot", as she calls it.
Our kitties were up on the roof when we came outside, they like to use the Trellis, to climb on the roof. They usually just walk around up there, (until they no longer feel like BIG, BRAVE, kitties!)

 Nala knows how to get down off the roof, from scary (and possibly traumatic) past experiences. Layla.. Well, that's another story. She knows how to, follow Nala, get on the Trellis, and climb to the roof. This is the second time we've had to rescue her. Oh well, hopefully she'll learn! (Until then, we'll keep a towel at the ready! For later rescue missions! Lol)
She was looking right at me for the LONGEST time!
She reminds me of a climber, scaling down a mountain.. except she's walking... and its house, not a mountain...

I hope you all had a wonderful morning like we had! (And maybe you helped (or in our case, rescued) someone today?)

Anyways, talk to you all soon,


Monday, August 19, 2013

What's A Favicon?

Have any of you ever, went to edit your blog and seen,
If not.. well.. Now you know that there is a such thing as a Favicon!
And, if you're like me, you are probably wondering, what in the world is a Favicon?!
A Favicon or, "Favorite Icon", is a little image that appears beside your website URL. Most sites now, have them.
(Image from: Wikipedia )

And Favicons also appear on your website tabs.


They are pretty simple to make and add extra decoration to your blog, or website!
I am going to tell you how to make one (more tech. stuff! I love to edit my blog! Make it cuter!)


1. The first thing to do is, open up an editing site! (Such as Photoshop or Pic Monkey!)

2. Then, choose a blank photo to "edit". (I recommend using mine!)
3. Next, upload (or choose) the image that you want to be your Favicon (something simple, because the image is going to be every small in the end.)
(I went with roses and over lapped them.)
4. Once you're happy with your design, crop all of the access off of it.
5. Now, re-size your picture to 16x16 or, if yours is a Blogger blog, anything under 100KB.
6. Save your picture.
7. Now, you're going to want to head on over to, ICO Converter.com, to convert your image from .JPG to .ICO.
8. Once you've done that all that's left is to upload it to your blog.

Or skip all these steps and visit, Favicon.cc, to draw your Favicon and save it!

I hope you enjoyed this, and that it wasn't too confusing!
Talk to you soon!,
(P.S- If your Favicon doesn't show up for a little while check out this website, http://(your blog URL)/favicon.ico, press refresh, and go back to your blog. Sometimes it takes a little while..)

Saturday, August 17, 2013

In need of buttons?

Ok so, I'm not sure if your aware of buttons. No, not buttons that go on your coat or keep your pants zipped, I'm talking about social media buttons. 
Social Media Buttons go on blogs and things, here this is what one looks like.
(Button made by: Deviant Art!)

Now, don't get me wrong, I make my own social media buttons (is it okay with you if I just call them buttons?). I just wanted to show you this one.. Let's get back to the explaining! 
buttons usually take you to either
  1. A person's email
  2. Their Twitter
  3. Their Facebook
  4. Their Google+
  5. Their Youtube
  6. Their Flickr
  7. Their Yahoo 
  8. Their Pinterest
And MUCH more! (I personally only use email, facebook, pinterest, and youtube.)
I LOOOVVVEE making buttons! It is so much fun!
I am also going to be telling you how to make buttons!
I have changed my buttons around so many times, I've lost track! So, for you today, I am going to show you all of the buttons I have made!  (Whether they work or not!)


(This one is DEFINITELY my favorite.. Too bad it wouldn't really work..)

Okay, now that you have seen a few of my creations, lets get into how to make your own! (Or you could use mine, credit appreciated!)
First, locate yourself a good site, in which to edit on. I use Pic Monkey, its easy and free! (You are also going to want a blank canvas to start out on! I recommend using mine! Click Here! )
Next, get an idea of what you want your buttons to look like. Squares? Circles? Triangles?
Once you have that, You can pick the shape out of the "Overlays" panel of your site.
After you have the color and size you want your buttons to be, go online and look up the logo of the social media website you are making a button for!
Then, save a photo that you think will go good over top of your shape.
 Then, see what color you want the actual logo to be. (I usually change mine to white.)
You can experiment with different boarders, colors, and shapes!
Once your happy with your design save it!
Next, you are going to have to upload your button to Flickr, to give it an HTML code.
After your photo is done uploading, click on it.
You are going to want to look in the right corner, there are a few buttons. Find the one that looks like a box with a arrow coming out.
 Click on that button. You will see the HTML code of your image appear. Copy that code!

Next, go to your blog settings. Go to where ever you add widgets or gadgets! Add a new widget, be sure to pick the one that says HTML or Java Script.
 Next, paste the code into the box. Now, find the part in the code that says, " http:// www.flickr.com/photos/" and then what ever your numbers are.

 
Delete that address. Now, if your button is, for example, for Pinterest you would replace that with the address of your Pinterest account.

And so on for all the other "Social Media's". The only one that is different is Email.
If you are making a button for your email you take out the whole http:// part and put in, "mailto:youremailaddress@whatever.com" 


Now, press save and you are finished! (You may have to re-size the button, which you can do quickly!)
To re-size your buttons do one of the following,
If you have blogger, like me-
Simply click settings, widgets, and the widget you just added (your button).
Click the button at the top right corner, that says Rich Text.

It should show you exactly what your button looks like.
Now you just have to click on your button and re-size it, the way you would crop something.
For people with out blogger or anything else-
Go back to your buttons code.
Check out the part of the code that says, "width:_ _ height:_ _" 


Play around with those numbers until your button is as tall and wide as you would like.

I hope you enjoyed this, and that it wasn't too confusing! I love making these and hopefully you will too!

I just recently made this video on how to make buttons for Youtube! Here it is,


Talk to you soon!,