Showing posts with label crafts. Show all posts

Wednesday, January 2, 2013

I'm Back!

Hey,

  So, I haven't been on in a long, long, long, long, long while! Yes, its past Halloween! Yes, its even past Thanksgiving! I will eventually get my Halloween night pictures on here and maybe some Fall decorations (from Thanksgiving)... Something I really did want to talk about was the DIY Network! I LOVE watching it! Because right now I am really into redecorating, I guess you could call it... :P I really want to redo my bathroom...


                                                                     My Plan

  1. Take out old mirror.

  2. Paint the bathroom

  3. Put in the backsplash, while leaving room above it, and the mirror to show a little of the wall...(This is the type of backsplash I want (the first picture, with the pink cabinents) Click--> Here!!

  4. Put in a new one with a frame and move it up

  5. I am either going to put mirrors in the middle of the cabinet drawers or I am going to paint them.

  6. Put pictures, a new light fixture above the mirror, new towels to hang/go in, and a new rug.


        I am VERY open to new ideas and would love to hear the comments you have about my bathroom, what I could do, what you have done, where I can get really cool, unique, rare, or maybe cheap but cute tiles, pictures, towels, or rugs! Comments on other things about the post, or any of my other  past posts!!!Please DO comment!!

        Another thing I now feel the need to do, and the thing my mom has kept on telling my I need to do, is get pictures for my room... Its pretty much full, I have my bed, closet, a desk and chair, a nightstand, and a cabinet/dresser/shelves type of thing (its from Ikea, but I'm not sure what to call it...). As for the top of my walls....bare. I am in disperate need of hanging something. I have painted on two canvases and I thought they would look good above my bed (I also have another canvas I got over the summer and I was planning to finish it and hang it along with the rest, like a group). But, I also have an old window that was in my old room, my mom had painted the glass panes (if you are wondering it was a picture of a topiary, my name, and a cone shaped bush) But, we took it down when I moved up stairs so we scraped out the painted picture and painted the acutal frame black. Now, my mom wants me to take photos (because I am into photography and she thinks I take good photos),turn them black and white, and put them in the window panes. I thought for a long time that my walls looked okay and I didn't need any photos but, now I am changing my mind. I really like how pictures add flare... I also want to buy little lights to hand from the ceiling above my cabinet/shelves thing or my desk...

        I REALLY like the idea of DIY,Do-It-Yourself, decorations for your bed or bathroom. Espicially because I don't want to spend a lot of money...(Its not like a TOTAL bath/bedroom remodel...). With that said, once again :), please leave comments and tell me cool DIY projects you've maybe heard of, done, seen someone else you know do, or a good idea for a DIY...


        An absolute GREAT place to find DIY, craft, decorating, wish-listing, and more ideas is Pintrest! I love how they have pictures that you can click on to find cool posts because, how else are you going to find something you otherwise wouldn't have? I don't know about you but, its not all that inviting to go to a website for ideas and to only see words...I NEED to see what the thing looks like... :P Thats why Pintrest is so great for me! You type in Pintrest, BOOM! It comes up! Then, you type in what you  want to look up, for example: DIY Christmas Decorations, BOOM! All these AWESOME pictures come up! Next, you scroll down to find a cool looking one, BOOM! You find one because, you can SEE the pictures...I'm just saying...

    (By the way, I love ALL sites with good ideas. It's just harder to find the ideas with no REAL WAY to know what they are, what they look like, or if they fit your taste (if you are looking up decorations)...


                                                      That concludes my post, talk to you later!

                                                                                                                                   ~Zoe

 http://www.wallpaperdirector.com/wallpaperdirector/sample/149736/santa-claus.gif


                           MerrChristmas!!!
                        and a happy New Year!! 

Monday, October 8, 2012

Columbus Day Crafts

Today is Columbus Day! I have some crafts and facts about Columbus Day.


Columbus Day

     Columbus Day is celebrated on the second Monday in October, for the US of course.  We celebrate Columbus Day in honor of Christopher Columbus' voyage from Spain to North America in 1492.   Christopher Columbus' crew sailed on the Niña, the Pinta, and the Santa Maria.  The Santa Maria sank in North America but, the Niña and Pinta made it back to Spain.  It took Christopher five weeks to reach North America.  His original goal was to find a route to Asia in order to trade valuable spices. 


 Rainstick


What you'll need:
Tin or Aluminium foil
Corn kernels, any small dry beans, tiny pasta
1 paper towel roll or any other type of long cardboard roll
Crayons, colored pencils, markers, and sequins
Tape or Glue
Scissors
brown construction paper, card stock, or a brown paper bag


        Using your brown paper trace the bottom of your cardboard tube then, draw a bigger circle around the first.  Draw lines connecting to your smaller circle. Now, cut along your lines you drew to your small circle. Put glue on each end of the cut rectangles. Line up the inner circle with the bottom of the cardboard tube now, gently fold each rectangle to the sides of the tube making sure the inner circle is blocking anything from falling out of the tube, let glue dry and continue. Now that your glues dry, your ready to use your aluminium foil! The piece of foil should be about 2 inches bigger than your tube (about 1 1/2 the length of your roll) and about 6 inches wide.  Roll the aluminium foil into to two thin ropes then, twist both into a spring like form.  Place the foil into your tube. Now, you add your dry bean, kernel, pasta assortment into the tube make sure it is about 1/10 full. (Different size, shape, and weight beans, kernels, and pasta make different sounds).  Now make another topper for the opposite end using the first few steps and your finished!  (You can also decorate using the markers, crayons, colored pencils, and sequins.


2. This is my second and final craft for Columbus Day,


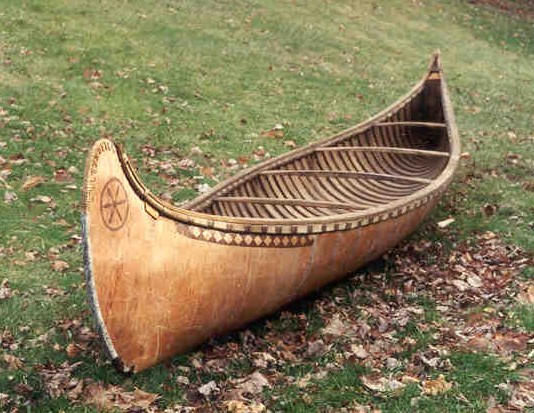
Birch Bark Canoe


What you'll need:
Scissors
string or yarn
construction paper or brown paper bag
hole puncher
Crayons, markers, colored pencils, or tempera paint


     Start off by folding the paper long ways.  About a half-inch from the first fold and fold again. Do this again on the other side (the folds will be the bottom of the boat).  Draw a canoe form in marker or crayon *remember the folds go on the bottom of the canoe*.  Cut out along your canoe lines and punch a few holes following the edges of the canoe.  Using your string or yarn weave in and out of each hole. Push the folded bottom flat to make it stand up.


     I hope you have enjoyed my Columbus Day crafts!  I know there aren't many, but they are really good ones!  I am about to post about my elves, maybe tomorrow. Bye!


                                                                                                                            ~Zoe


I have gotten all of my crafts and information off of Enchanted Learning Thanks for having a really wonderful web site, it is probably my favorite web site for crafts of any sort!


Enchanted Learning

5 Cool, Creepy, and Crafty Halloween/Fall projects to do

So, I just created this blog (with my mom's help:)) and I decided what better thing to do my first post about then these really cool Halloween projects I've been doing!


Since Halloween is coming up, I've been looking for some really cool and FUN crafts, but surprisingly I haven't found many.  I mean, you would think from looking up Halloween crafts on the internet you would find at least a gazillion hits to the word "craft".  So, since I HAVE found a trickle of crafts I decided that I should make my own post on the crafts I find. Stop searching your crafting hot spot is here!


1. The first few crafts I actually found were out of a Family Fun magazine my mom subscribed to a while back.                                                          
                                                       Feather your Nest
                                           
                                              What you'll need:
1 toilet paper roll
Coffee filters or cupcake liners,
really anything with ruffles you can over lap to create
a feather effect*
 Tacky Glue or tape
White or orange construction paper or card stock
1 black marker
                
*Please note: If you use coffee filters you may need to dye them if you want brown and yellow owls. I tried to dye mine and the waves came out when they got wet. 

                  
 To create one of these cute creatures cut one inch off the top of your toilet paper roll, fold in the top, and
use tape to hold in place(1).  Next, cut the coffee filter or cupcake liners into quarters(2), and glue or tape onto your toilet paper roll(3).  Now, keep repeating step two until the front of the paper roll is covered (or until as feathery or ruffly as you want.)  Now, cut out the owls eyes from the construction paper or card stock.  Use the black marker to draw a circle to create pupils in the middle of the construction paper and glue them on the feathered toilet paper roll(4)  (You can also cut out circles from the filters and glue them behind the eyes)(5).  Now, using the orange construction paper cut a triangle for the owls beak, glue it on(6).  For wings, cut rectangles from the ruffles of the filter/liners and glue to the sides of paper roll (7)  Let it completely dry and you have a new fall decoration!
**1**
                                                                       
**2**
                                                                          
**3**
                                                                                   
**4**
                                                                         
**5**
                                                                         
**6**
                                                                           
**7**


2. This craft was also from the Family Fun magazine,


 Cotton Swab Skeletons

What you'll need:
Lots of cotton swabs
Plastic Wrap or Wax Paper
1 cotton ball
Black construction paper
Lots of glue
Thread
Tape


To make this spooky spine tingling skeleton, you first need to tape down the plastic wrap or wax paper to the surface you'll be working on. Next, build a skeleton form (any way you like, there are multiple ways to make one!) Now your ready to glue! Squeeze the glue, in generous globs, on all of the "joints" (where the cotton swabs connect). Make sure to glue your cotton ball to the top of the skeleton to make a head. Now, use your black construction paper and cut out many different shapes and glue to cotton ball to make the features of the face. Use your thread to hang the skeleton up in your home! (My mom  hung my brother's up through the "ribs" of his skeleton).             ----->


3. This craft I found off of the web site www.kidspot.com.au


                                                            Spook your Mantle 

      
  What you'll need:
1 sheet of black construction paper
1 sheet of green construction paper
1 sheet of white construction paper
  1 sheet of purple construction paper
Tape
Scissors
Glue
Silver or Gold Paint pen
 marker, colored pencil, or crayon


 To start, roll the paper into a cone and secure with tape. Now, cut the bottom to make it level. Next, on the white sheet of paper draw a mouth, eyes, and a nose with the marker cut them out (You will use them later). Cut a big circle in the green sheet of construction paper. Cut out the center of the circle leaving about a 10cm band around the circle. Save the scrapes. Now, slide the ring you just made around the cone to make the bottom of the witches hat. Now glue the eyes, mouth, and nose to the witch. Cut the purple paper into strips  about 10cm long and about 3cm wide, glue around the witches head for hair. To finish off your spooky decoration use the gold and silver paint pens to draw the witches buckle onto her hat. 


4. I found this one on Enchanted Learning

                                                   
                                                        Jack-o-Lantern Mask


                                                                     What you'll need:
2 paper plates
orange, green, brown, and yellow crayons, 
markers, or colored pencils
yarn, string, or elastic
Scissors
 1 pen
Hole puncher


 To start, take your two paper plates and put them together ( they will make your mask more sturdy). Next, color your paper plates with orange and yellow. Draw a stem and leaves using the green and brown crayons, markers, or colored pencils. Now use your pen to draw on the eyes, nose, and mouth of your mask ( remember you will be wearing this, so make sure you place each feature according to your own.  When you wear it, you want to be able to see, talk, and breath normally, like you would a real mask.) Use the scissors to cut out each piece. Now, put two hole punches, exactly straight with each other, and tie your yarn so that it fits your head. Congrats! Now you are ready for Halloween with this disguise!


5. I found this one also on Enchanted Learning


A Homemade Leaf Wreath


What you'll need:
2 Paper Plates
A few sheets of black and orange
construction paper
Scissors
Glue
String
Stapler


Glue the two paper plates together (to make them more sturdy) (1). 


**1**


Next, trace the leaves onto the construction paper and set them aside (2). 


**2**


Now, cut the inner circle out of the paper plates (3). 


**3**


Glue the leaves to the paper plates (4). 


Take the ends of your string and staple to the back of both paper plates.  Now, go and hang your wreath on your front door, back door or wall!


         I hope you have enjoyed my Fall/ Halloween crafts. I know how hard REALLY good ones are to find. So, be sure to visit back to my blog. Also, today is Columbus Day and I am going to post some more crafts! I am also thinking about doing a post on desserts soon!


                                                                                                                           ~~Zoe!


        Thanks to Enchanted Learning, Family Fun, and Kids Spot ,the places where I found all of the crafts shown, thanks again!:) 


                        Family Fun                             Kids Spot                        Enchanted Learning